Thursday, July 7, 2016

​​វិធី​​សាមញ្ញ​ៗ​ ៤ ជួយ​ឲ្យ​ iPhone ដើរ​លឿន​ដូច​ថ្មី​

​​វិធី​​សាមញ្ញ​ៗ​ ៤ ជួយ​ឲ្យ​ iPhone ដើរ​លឿន​ដូច​ថ្មី​

​iPhone ​ម៉ូដែល​​ណា​ក៏​ដូច​ជា​ម៉ូដែល​​ណា​ដែរ ដោយ​ការ​ប្រើ​ប្រាស់​រយៈ​ពេល​យូរ​ៗ​ទៅ​ធ្វើ​ឲ្យ​​ទូរសព្ទ​ហាក់​មាន​សភាព​យឺត​ ស្ទក់​ ជាង​ពេល​ទើប​ប្រើ​ដំបូង។ ប៉ុន្តែ​​​​វិធី​​សាមញ្ញ​ៗ​ ៥ ​ខាង​ក្រោម​ជួយ​ឲ្យ​iPhone នៅ​តែ​ដើរ​លឿន​ដូច​ថ្មី៖

​១. រក្សា​ថាមពល​ថ្ម​​ឲ្យ​នៅ​ភាគរយ​ខ្ពស់
iPhone-6s-front
យោង​តាម​ការ​សិក្សា​ iPhone របស់​អ្នក​ដំណើរ​ការ​បាន​ល្អ​បំផុត​នៅ​ពេល​ថាមពល​ថ្ម​ស្ថិត​នៅ​កម្រិត​ ៤០%-៨០%។ ជៀស​វា​ប្រើ​ iPhone ពេល​ដែល​ថ្ម​អស់​រលីង​ព្រោះ​អាច​ធ្វើ​​ឲ្យ​ទូរសព្ទ​រលត់​ដោយ​ខ្លួន​ឯង​ និង​ ប៉ះពាល់​ដល់​ដំណើរ​ការ​របស់​ទូរសព្ទ​នៅ​​ថ្ងៃ​មុខ។

11
កម្មវិធី​នេះ​នឹង​ជួយ​បិទ​ចោល​នូវ​កម្មវិធី​ទាំង​ឡាយ​ណា​ដែល​រត់​លើ​ Background, ជួយ​​ឲ្យ​ RAM ទំនេរ​ច្រើន​ ដោយ​ចំណុច​​ទាំង​ពីរ​នេះ​ជា​ចំណែក​ដ៏​ធំ​ ធ្វើ​ឲ្យ​ iPhone ដើរ​លឿន។

៣. បិទ​ Transparency
tips-to-speed-up-iphone-4-or-iphone-4s-running-ios-7-reduce-transparency
 Transparency ជា​មុខងារ​មួយ​ធ្វើ​ឲ្យ​ផ្ទៃ​​ Background នៃ​ Notifications Bars និង Background​ នៃ​កម្មវិធី​​លើ​ Homescreenមាន​ភាព​ព្រិល​ស្អាត ប៉ុន្តែ​ការ​ព្រិល​ស្អាត​នេះ​ក៏​បាន​ប្រើ​ប្រាស់​ RAM និង​ CPU ផង​ដែរ។ ដូច​នេះ​​ដើម្បី​ជា​ចំណែក​មួយ​ឲ្យ​ iPhone ដើរ​លឿន​គួរ​ចូល​បិទ​មុខងារ​ Transparency ដោយ​ចូល​ទៅ​ Settings → General → Accessibility → Increase Contrast → Reduce Transparency

៤. បិទ​ Effect
Turn-off-motion
Effect នៃ​ Animation ជា​ហេតុ​ធ្វើ​ឲ្យ​ការ​បិទ​/បើក​កម្មវិធី​មាន​សភាព​ស្ទក់​ ដោយ​អ្នក​​អាច​កំណត់​កុំ​ឲ្យ​កើត​មាន​តាម​រយៈ​Setting → General → Accessibility → Reduce Motion → រួច​ដំណើរ​ការ​មុខងារ​ Reduce Motion នោះ​ជា​ការ​ស្រេច៕

Saturday, June 25, 2016

How to Remove the “Get Windows 10” Icon from Your System Tray (and Stop Those Upgrade Notifications)

How to Remove the “Get Windows 10” Icon from Your System Tray (and Stop Those Upgrade Notifications)


Ever since Windows 10 came out, Windows 7 and 8 users have been bombarded with upgrade notifications, thanks to a little Windows icon in their system trays called GWX (“Get Windows 10”). Here is how to remove that icon and avoid the pushy notifications.
This article was originally published in June 2015. Since then, a new tool has come out that does a more straightforward job of preventing unwanted Windows 10 updates, so we’ve updated the article with information about it.
We’re all aware of Windows 10 here , and in truth, we actually like it–it finally fixes most of Windows 8’s ills, and brings some handy new features. But we can’t go a day without hearing about Microsoft pushing the upgrade just a little too hard. If you don’t want to upgrade to Windows 10 right now, and you’re sick of the nagging, here’s how to fix it.

The Problem: An Icon You Can’t Get Rid of, and Constant Nagging for Updates

The “Get Windows 10” (GWX) upgrade is an icon and dialog that resides in user’s system trays, which has alarmed quite a few people, who aren’t sure if it is some kind of trick or malware. Let us say with no uncertainty, it is not, but it is a little underhanded and annoying on Microsoft’s part.
The “Get Windows 10” icon opens a dialog that hypes the upcoming Windows upgrade and determines your availability to receive it for free.
When you click this icon, a dialog will appear, which will determine if your PC is Windows 10 ready, if you’re eligible to upgrade for free and, of course, regale you with all the wonderful things Windows 10 will mean to you.
This new icon and its resulting dialog are actually part of an application that appeared in late April 2015 as a recommended Windows update (KB3035583), and which has undergone several revisions to facilitate the upgrade process as well as skirt efforts to remove it.
You will see this update in one of two ways, if you have the “Give me recommended updates the same way I receive important updates” box checked in Windows Update, you will see KB3035583 as an optional update. If you have “Give me recommended updates the same way I receive important updates” unchecked, you will see KB3035583 as an unchecked but italicized update.
If you read Microsoft’s description on the update’s support page, it’s apparent that this is optional:
This update installs the Get Windows 10 app that helps users understand their Windows 10 upgrade options and device readiness. For more information about Windows 10, see Windows 10.
Further, in the most recent iteration of KB3035583, if you have it hidden, it will now be unhidden. The long story short KB3035583 is annoying and it’s unreasonably difficult to easily make it go away.

What Is KB3035583?

Basically, KB3035583 simply lets Windows Update pester you about upgrading to Windows 10. KB3035583, otherwise known as GWX, is an executable that starts with your system via the Task Scheduler.
GWX.exe is the system tray icon. When you click the system tray icon, it spawns the application “GWXUX.exe”, which is the upgrade dialog discussed earlier.
To make this icon and its notifications go away, Microsoft unhelpfully recommends hiding them.
This works for the current session, but restart your system (which happens from time to time), and it reappears. You can’t right-click on the icon and tell it not to bug you anymore, and while you could remove its entry from the Task Scheduler, that doesn’t actually remove the GWX application from your system.
More importantly: Just because it’s hidden doesn’t mean it won’t pester you about upgrading.
If you don’t want this item on your system, we recommend removing the update altogether. We don’t feel it is critical to upgrading to Windows 10, and even if it is, you can always go back into Windows Update and reinstall KB3035583, or you can use the following method and forgo all this rigamarole altogether.

Never10: The Best and Easiest Way to Prevent Windows 10

In the 11 months since we first published this article, the Get Windows 10 (GWX) system has annoyed countless Windows 7 and 8.1 users, and in that time, Microsoft has maneuvered time and time again to get 10 installed on as many machines as possible. Often it has done this despite these users plainly not wanting this update, period.
So, what follows is what currently appears to be the absolute best way to do so, by using a small (81KB) freeware tool called Never10.
Never10 was developed by well-respected security researcher Steve Gibson, which means it’s trustworthy and contains no adware, viruses, or other assorted malware nastiness up its sleeve. Basically, it acts as a frontend for Microsoft’s hidden settings that prevent the Windows 10 upgrade.
Let’s dig in briefly and show you how Never10 operates. Firstly, here’s the infamous GWX icon in the system tray, which when right-clicked will give you various options to educate yourself about or simply upgrade to Windows 10.
This icon will occasionally bug you with reminders that Microsoft thinks it would be a great idea to upgrade your PC to Windows 10. We want this behavior to stop, so we’ll use Never10 to do that.
First we cruise on over to the Never10 homepage, and scroll down to download the Never10 executable. Alternatively, you can actually go directly the Never10 freeware page.
Never10 doesn’t require installation; it runs as a standalone executable. So just double-click it to start it up.
Never10 will tell you whether the Windows 10 upgrade is enabled on your system. If it is, click the “Disable Win10 Upgrade” button.
Upon clicking that button, you’ll be presented with the following confirmation and you shouldn’t be bothered by GWX again, unless Microsoft once again attempts to circumvent this.
Keep in mind that the GWX system tray icon may not immediately disappear from your system tray, instead continuing to reside there and even offering to help you with the upgrade if you click on it. We discovered however that it did indeed go away after a simple restart.
You can also click the “Remove Win10 Files” button to remove the upgrade files from your system, which should free up some hard drive space. However, according to Gibson, Windows will remove these files automatically eventually anyway, so it doesn’t really matter if you remove them now or let Windows do it later.
There are a couple of instances where you might see a different outcome. If you try to run Never10 on a system other than Windows 7 or Windows 8.1, it will inform you that it is intended only for those two systems since they are the targets of Microsoft’s upgrade path.
Also, if you try to run Never10 on a system that doesn’t have the latest GWX files, Never10 won’t work, but will offer to download those files so it can properly do its job. This seems counterintuitive, but due to the way Never10 works, it makes sense. It doesn’t actually remove GWX completely: it just prevents it from ever running, using Microsoft’s built-in hidden settings for doing so.
There is another program, called GWX Control Panel, that performs a similar function–and we recommended it when we originally wrote this article. If you really hate GWX and want to remove every trace of it from your system, GWX Control Panel will allow you to do so. It’s a bit more complex than Never10, and its extra features aren’t necessary for most users. However, if you’re tech savvy, and you want full control over the entire process, GWX Control Panel is another option.
screenshot.1
For the vast majority of users, however, Never10 is all you need.

Before we wind things up, we need to reiterate that we do believe that if you’re using any recent version of Windows (7 or 8.1), or you’ve held off and are still using Vista or even XP, that this is the time to finally take the plunge. Windows 10 is a worthy upgrade and probably an unqualified success at retaining the spirit of Windows 7 while correcting the ills of Windows 8.1.
That said, installing a separate application as a recommended update is a sneaky way to go about ensuring user adoption. Add to that the fact that there’s no simple way to disable the GWX.exe application other than removing its autostart line from the Task Scheduler or uninstalling it through Windows Update, and we’re further puzzled at Microsoft’s reasoning and lack of transparency.
In the end, whether you feel this update process is helpful or whether you can make your way to upgrading to Windows 10 all by yourself will simply depend on how you’re used to doing things.
Others may choose to do a clean install and for that, updating through an existing Windows install won’t even apply.
Source: Howto
How To Install iOS 10 Beta OTA Update Without Developer Account

How To Install iOS 10 Beta OTA Update Without Developer Account

With Apple having revealed iOS 10 in all its glory at WWDC kickoff, and as is the custom, having released the first beta for users enrolled into the Apple Developer Program, it is likely many are itching to get their hands on the latest iteration of the company’s mobile OS. Those who aren’t registered with the Apple Developer Program, however, will have to wait a little longer.
As Apple has announced already, while developer betas for both iOS 10 and macOS Sierra are already out and about, their public variants will be released some time in July, which isn’t very far away.


If, however, you just can’t have your iPhone, iPad or iPod touch stay out of date for a second longer, read on for a way you can get your hands on iOS 10 beta without having to sign up for a developer account. And yes, you don’t have to have your UDID registered either!
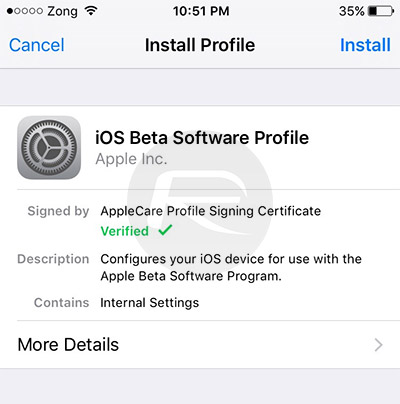
This method involves the installation of a verified Apple Configuration Profile that triggers an OTA update to the beta firmware. As is the wise thing to do before any and all beta build installations, backup your device to iCloud or iTunes before starting. I can’t stress this enough. Make sure you have secured your data in case something goes wrong or you decide to go for a fresh restore later on. Also, you might want to check if your device is compatible with the latest iOS 10 from Apple.
This is what you need to do.
Step 1: On your iOS device, launch Safari, and open this link: bit.ly/1sE8gZa.
Step 2: Download the profile to your device by tapping the Download Now button.
Step 3: When asked on which device would you like to install this profile? Select iPhone.
Step 4: In the screen that follows, hit Install. After the profile is installed, your device will be rebooted.


Step 5: Once your device is done rebooting, launch the Settings app, navigate to General > Software Update and you should find the iOS 10 Developer Beta OTA update waiting for you there.


Step 6: Hit Download and Install, sit back and relax.
Once your device is done updating, it should reboot into the first beta of iOS 10. Test away!

អានបន្ត: ថែរក្សាថ្មIPhoneរបស់អ្នកជាមួយទម្លាប់៥យ៉ាងនេះ
How to Play Your Favorite PS4 Games Remotely on Any Android Device

How to Play Your Favorite PS4 Games Remotely on Any Android Device

Sony's starting to warm up to the current trend of interconnected devices, but just like most manufacturers, they want to keep you within their ecosystem if you're going to use these services. For instance, the PlayStation 4 has a "Remote Play" feature that allows you to play your previously purchased console games on the PS Vita and Sony's Xperia smartphones, but this functionality does not extend to non-Sony devices.

Well, developer Twisted89 took the Xperia Smart Remote Android app and got rid of a series of checks that would previously limit its usability. The restrictions he removed included a device ID check, a root constraint, and a Wi-Fi limitation.
Simply put, you can now use Sony's Remote Play app to play your favorite PS4 games on almost any Android device—whether it's rooted or not, and regardless of if you're on your local Wi-Fi network or a thousand miles away on mobile data.
Requirements
  • Sony PlayStation 4 (console and games)
  • Android device running Ice Cream Sandwich (4.0) or higher
  • Unknown sources enabled

Step 1: Enable Remote Play on Your PS4

First up, you'll need to enable a single option on your PS4. From the home screen, head up to "Settings," then scroll down and select the "Remote Play Connection Settings" entry.
From here, make sure that the "Enable Remote Play" option is ticked, then you'll be all set to go.

Step 2: Install the Modded Remote Play App on Your Android

Next, head to this link from your Android phone or tablet to grab a copy of the modified Remote Play app. Once the download has finished, tap the corresponding notification to launch the APK. At this point, Android's installer interface should come right up, so press "Install" here.
Immediately after you open the app for the first time, Remote Play will prompt you to register a DualShock controller. This feature does not work in this version of the app (more on that later), so hit "Skip" here. After that, tap the "Next" button at the top of the screen, then sign into your PlayStation account
As soon as that's finished, you should automatically be redirected to the gameplay interface. In portrait mode, you'll see all of the regular PlayStation controls on the bottom half of the screen, and you can use these to navigate your PS4's interface and play games.
(1) Portrait interface (PS4 home screen). (2) Gameplay with virtual joystick in use.
If you rotate your device into landscape mode, these same controls will be overlaid on top of a full screen view of your game. If you're not interacting with the screen, these controls will automatically hide after a few seconds, but they can be brought back up by tapping anywhere on the screen.
Full screen landscape mode with virtual buttons shown.

Step 4: Pair a PS4 Controller with Your Android Device (Optional)

Since the official DualShock controller pairing solution does not work in this version of the app, you might want to pair a controller manually. To begin, press and hold the "PS" and "Share" buttons on your controller, then wait until the light on the back begins blinking.
From here, make sure that Bluetooth is enabled on your Android device, then head to the Bluetooth settings menu. Tap the "Refresh" button at the top of the screen to perform a search for nearby devices, then select the "Wireless Controller" option when it comes up. Wait until the controller shows up in your "Paired devices" list, then you'll be able to use your Remote Play games with a DualShock controller.
For more information on this topic, including how to customize gameplay settings for your PS4 controller on Android, be sure to check out Neil's detailed guide.

Step 5: Modify APN Settings to Play on Mobile Data (Optional)

This version of Remote Play can be used over mobile data to play games from anywhere in the world, but it does require a bit of setup.
To begin, head to your phone or tablet's Settings menu, then search for "Access Point Names" and tap the top result. From here, tap the settings icon next to your existing APN entry, then write down all of the information in this list. To make things easier, you may want to take a couple of screenshots of the APN settings for reference.
Next, head back to the main Access Point Names menu, then tap the "Add" button. From here, enter all of the information from your existing APN with the exception of two fields—in the "Name" category, type "PS4" instead, and for the "APN protocol" option, select IPv4 rather than IPv6. When you're done there, head back out to the main APN screen, then select your "PS4" profile and reboot.
At this point, you'll be able to play any of your PS4 games over mobile data—even if you're thousands of miles away from your home and your console.

អានបន្ត: "Just A Dream" by Christina Grimmie Sam Tsui & Nelly
Source: Wonderhowto